
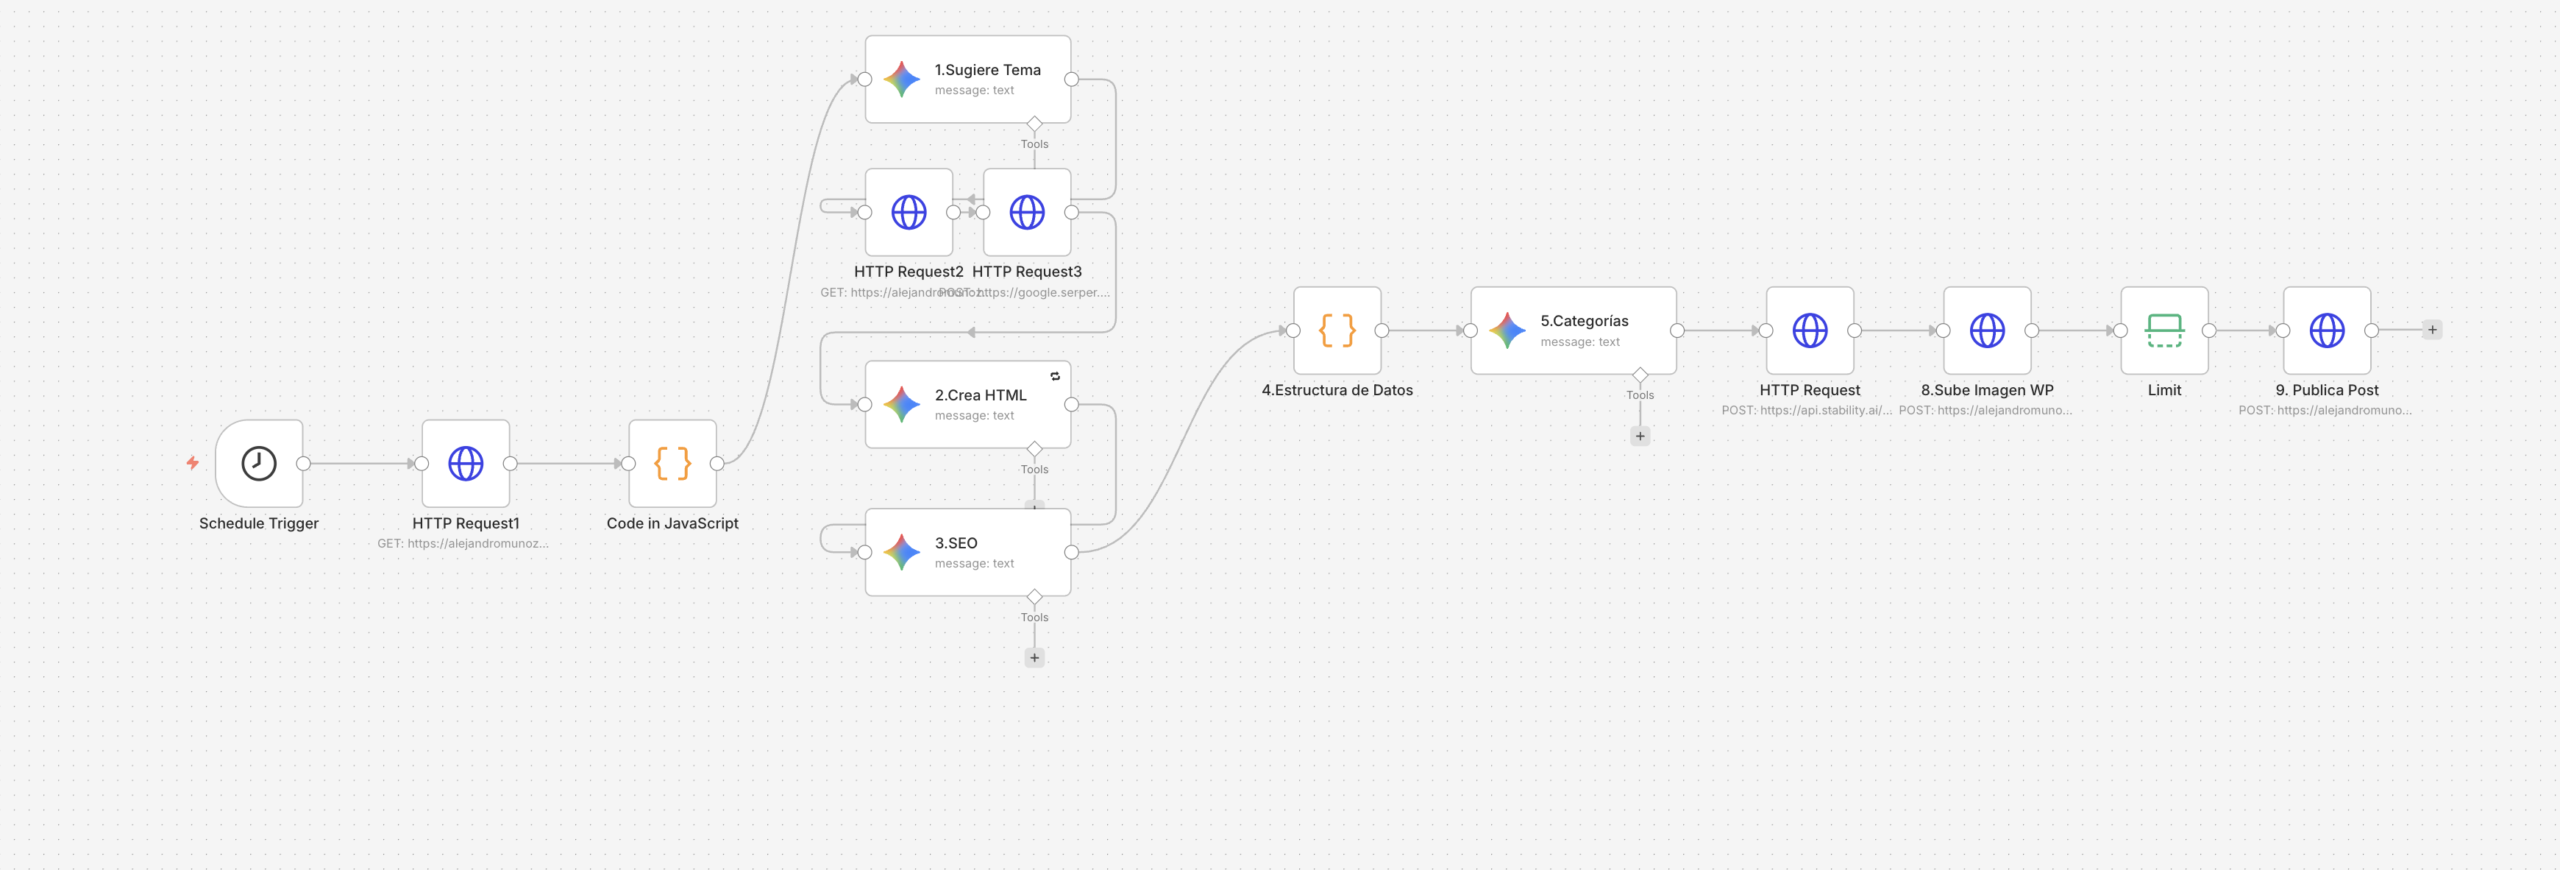
I run a fully automated blog publishing pipeline. From topic idea to published WordPress post — including SEO optimization, featured image generation, and category assignment — the entire process runs without me touching it.
This is the exact workflow I built. Not a theoretical tutorial — this is what actually runs in my n8n instance right now.
What the Workflow Does
Before getting into the setup, here’s exactly what this pipeline automates:
- Topic selection — Gemini analyzes a topic list and picks the best one based on SEO potential and relevance
- Research — Serper API pulls top-ranking search results for the chosen topic
- Content generation — Claude API writes the full post (title, H2/H3 structure, body, FAQ section)
- SEO optimization — meta title, meta description, and focus keyword are generated automatically
- Image generation — Stability AI creates a featured image based on the post topic
- WordPress publishing — the post goes live via WordPress REST API with all fields populated
- Notification — a Telegram message confirms the post published successfully
The whole process takes about 3-4 minutes per post. I schedule it to run three times a week.
Tools You Need
- n8n (cloud or self-hosted) — the automation engine
- Google Gemini API — topic selection and content planning
- Anthropic Claude API — content generation
- Serper API — search research
- Stability AI API (or Freepik Flux) — image generation
- WordPress with Application Passwords enabled
- Telegram Bot (optional) — notifications
All of these have free tiers or low-cost entry plans. The total running cost for this workflow is approximately $5-15/month depending on volume.
The Workflow Architecture
The pipeline has 6 main stages connected in sequence:
Schedule Trigger
    ↓
Topic Selection (Gemini)
    ↓
Search Research (Serper)
    ↓
Content Generation (Claude)
    ↓
Image Generation (Stability AI)
    ↓
WordPress Publish + Telegram Notify
Each stage feeds data into the next. If any stage fails, n8n stops the workflow and sends an error notification.
Stage 1: Schedule Trigger
The workflow starts with n8n’s Schedule Trigger node.
Configuration:
- Trigger: Cron
- Schedule:
0 9 * * 1,3,5(Monday, Wednesday, Friday at 9am)
You can adjust this to whatever frequency makes sense for your site. I recommend starting with 2-3 posts per week — enough to build content volume without overwhelming your editorial review process.
Stage 2: Topic Selection with Gemini
This node calls the Google Gemini API to select the next topic from a predefined list.
Node type: HTTP Request
Setup:
Method: POST
URL: https://generativelanguage.googleapis.com/v1beta/models/gemini-2.0-flash:generateContent
Authentication: Header Auth → x-goog-api-key: YOUR_GEMINI_KEY
Prompt template:
You are an SEO content strategist for a blog about AI tools and automation.

Here is a list of potential post topics:
[TOPIC LIST]

Select the SINGLE best topic to write about next based on:
1. Search volume potential
2. How well it fits the blog's audience (freelancers, solopreneurs)
3. Whether it hasn't been covered recently

Respond with ONLY a JSON object:
{
  "topic": "selected topic title",
  "keyword": "primary SEO keyword",
  "category": "automation|ai-tools|comparisons|workflows|roundups"
}
Topic list management: I maintain a Google Sheet with ~50 topic ideas. The n8n workflow reads from this sheet before calling Gemini, so the AI always has fresh options to choose from.
Stage 3: Search Research with Serper
Once the topic is selected, this node searches for the top-ranking content on that keyword. This gives the AI context about what’s already ranking — which improves content quality significantly.
Node type: HTTP Request
Setup:
Method: POST
URL: https://google.serper.dev/search
Headers: X-API-KEY: YOUR_SERPER_KEY
Body:
{
  "q": "{{ $json.keyword }}",
  "num": 5
}
The node returns the top 5 search results: titles, URLs, and snippets. This data gets passed to the content generation stage.
Why this matters: AI-generated content without research context tends to be generic. Feeding real search results into the prompt forces the model to understand what’s already ranking and write something more comprehensive.
Stage 4: Content Generation with Claude
This is the core of the workflow. The Claude API generates the full blog post based on the topic, keyword, and research data from the previous stages. Not sure which AI model is best for content generation? Read our Claude vs ChatGPT vs Gemini comparison.
Node type: HTTP Request
Setup:
Method: POST
URL: https://api.anthropic.com/v1/messages
Headers:
  x-api-key: YOUR_CLAUDE_KEY
  anthropic-version: 2023-06-01
  content-type: application/json
Request body:
json
{
  "model": "claude-sonnet-4-5-20241022",
  "max_tokens": 4000,
  "messages": [
    {
      "role": "user",
      "content": "You are an expert content writer for a blog called Fluxzyn, focused on AI tools and automation workflows for freelancers and solopreneurs.\n\nWrite a comprehensive, SEO-optimized blog post about: {{ $('Gemini Topic').item.json.topic }}\n\nPrimary keyword: {{ $('Gemini Topic').item.json.keyword }}\n\nTop ranking content for reference:\n{{ $('Serper Research').item.json.organic }}\n\nRequirements:\n- 1,500-2,500 words\n- Use H2 and H3 headings\n- Include practical, actionable advice\n- Write from first-person perspective — someone who actually uses these tools\n- End with a FAQ section (5-7 questions)\n- Do NOT include a title in the response — just the body content starting with the introduction\n\nAlso provide at the end, separated by ---METADATA---:\nSEO_TITLE: [60 characters max]\nMETA_DESCRIPTION: [155 characters max]\nEXCERPT: [2-3 sentences]\nWORDPRESS_TITLE: [Full post title]\n\nReturn everything in plain text with markdown formatting."
    }
  ]
}
Parsing the response: After Claude responds, I use an n8n Code node to split the content at ---METADATA--- and extract the post body and metadata separately.
javascript
const response = $input.first().json.content[0].text;
const parts = response.split('---METADATA---');

const body = parts[0].trim();
const metaRaw = parts[1] ? parts[1].trim() : '';

// Extract metadata fields
const seoTitle = metaRaw.match(/SEO_TITLE:\s*(.+)/)?.[1]?.trim() || '';
const metaDesc = metaRaw.match(/META_DESCRIPTION:\s*(.+)/)?.[1]?.trim() || '';
const excerpt = metaRaw.match(/EXCERPT:\s*([\s\S]+?)(?=WORDPRESS_TITLE:|$)/)?.[1]?.trim() || '';
const wpTitle = metaRaw.match(/WORDPRESS_TITLE:\s*(.+)/)?.[1]?.trim() || '';

return [{
  json: {
    body,
    seoTitle,
    metaDesc,
    excerpt,
    wpTitle
  }
}];
Stage 5: Image Generation
With the post content ready, the next step generates a featured image. I use Stability AI’s API, though Freepik’s Flux generator is a viable alternative with better output quality.
Node type: HTTP Request
Stability AI setup:
Method: POST
URL: https://api.stability.ai/v2beta/stable-image/generate/core
Headers:
  Authorization: Bearer YOUR_STABILITY_KEY
  Content-Type: application/json
Image prompt generation: Before calling the image API, I use another Code node to build a prompt from the post topic:
javascript
const topic = $('Gemini Topic').item.json.topic;

const prompt = `Minimalist flat design illustration for a tech blog post about: ${topic}.
Clean white background, purple accent color, geometric shapes,
professional and modern, suitable for a blog header, 16:9 ratio,
no text, no people`;

return [{ json: { imagePrompt: prompt } }];
Image handling: Stability AI returns the image as base64. I decode it and upload it directly to WordPress Media Library in the next stage.
Stage 6: WordPress Publishing
This is where everything comes together. The WordPress REST API receives the post content, metadata, and featured image.
Step 6a: Upload image to Media Library
Method: POST
URL: https://yoursite.com/wp-json/wp/v2/media
Authentication: Basic Auth (username + Application Password)
Headers:
  Content-Disposition: attachment; filename="post-image.png"
  Content-Type: image/png
Body: [binary image data]
Step 6b: Create the post
Method: POST
URL: https://yoursite.com/wp-json/wp/v2/posts
Authentication: Basic Auth
Body:
{
  "title": "{{ $('Claude Content').item.json.wpTitle }}",
  "content": "{{ $('Claude Content').item.json.body }}",
  "excerpt": "{{ $('Claude Content').item.json.excerpt }}",
  "status": "publish",
  "categories": [CATEGORY_ID],
  "featured_media": "{{ $('Upload Image').item.json.id }}",
  "meta": {
    "rank_math_title": "{{ $('Claude Content').item.json.seoTitle }}",
    "rank_math_description": "{{ $('Claude Content').item.json.metaDesc }}"
  }
}
Important: To use Application Passwords in WordPress, you need to make sure your security plugins aren’t blocking them. If you’re using Wordfence, Application Passwords may be blocked by default. If you get 401 errors, you’ll need to add a mu-plugin that re-enables them with a priority 999 filter.If you had issues with this before (like I did with a different setup), a mu-plugin fix resolves it.
Stage 7: Telegram Notification
The final node sends a Telegram message confirming the post published successfully.
Node type: Telegram
Message template:
✅ New post published on Fluxzyn

📝 {{ $('Claude Content').item.json.wpTitle }}
🔗 {{ $('WordPress Publish').item.json.link }}
📅 {{ $now.format('DD/MM/YYYY HH:mm') }}
If any node in the workflow fails, a separate Error Workflow sends a different message:
❌ Fluxzyn workflow failed

Stage: {{ $execution.lastNodeExecuted }}
Error: {{ $execution.error.message }}
Anti-Repetition Logic
One problem with automated content pipelines: the AI tends to repeat topics or angles. I added a Gemini-based anti-repetition check that reads the last 10 published post titles from WordPress before selecting a new topic. Once your blog is automated, the natural next step is automating your LinkedIn posting with n8n to distribute your content automatically.
The check:
javascript
// Get last 10 post titles from WordPress API
const recentPosts = $('Get Recent Posts').all().map(p => p.json.title.rendered);

// Add to Gemini prompt
const avoidList = recentPosts.join('\n');

// Append to topic selection prompt:
`Avoid topics similar to these recently published posts:\n${avoidList}`
This simple addition significantly reduces content repetition over time.
Quality Control: Should You Review Before Publishing?
This is a real question. My current setup publishes directly without human review. Here’s my honest take:
Publish directly if:
- You’ve tested the workflow extensively and trust the output quality
- You’re generating informational content (not opinions or news)
- You review posts after publishing and update them as needed
Add a review step if:
- You’re just starting out with the workflow
- Your blog has an established audience with high expectations
- The content requires accuracy that AI can’t guarantee (technical specifics, current data)
To add a review step, change "status": "publish" to "status": "draft" in the WordPress node. Posts will save as drafts for you to review and publish manually.
Common Issues and Fixes
WordPress API returns 401 Unauthorized
- Check that Application Passwords are enabled in WordPress
- Verify the username and password are correct
- Make sure the user has Editor or Administrator role
Claude returns malformed JSON
- Add a retry node after the Claude call
- Use a more explicit prompt: «Return ONLY valid JSON, no markdown backticks»
- Add error handling that retries with a simplified prompt
Images fail to upload
- Check the Content-Type header matches the image format
- Verify the file size — WordPress has a max upload size limit
- Compress images before uploading with an n8n Code node
Workflow runs but post doesn’t appear
- Check post status — it might be saving as draft
- Verify category IDs match your WordPress categories
- Check the WordPress error log for REST API errors
The Full Workflow Cost Breakdown
Running this workflow 3 times per week (12 posts/month):
| Service | Cost |
|---|---|
| n8n Cloud Starter | $20/month |
| Claude API (claude-sonnet-4-5, ~3000 tokens/post) | ~$0.50/month |
| Gemini API | Free tier (sufficient) |
| Serper API | 2,500 free searches at sign-up (one-time), then paid plans from $50/month |
| Stability AI | ~$2/month |
| Total | ~$25/month |
For 12 SEO-optimized posts per month, that’s about $2 per post. Freelance content writers charge $50-200 per post for comparable length. The math is obvious.
Build a fully automated blog with AI using n8n, OpenAI (GPT-4), and WordPressThis workflow automates the entire editorial process: from keyword research and content generation to SEO optimization and final publishing. Scale your content strategy with a 100% automated pipeline that maintains high quality and search engine relevance
Tiempo total: 30 minutos
1. Source Your Content Ideas
Connect a Google Sheet or an RSS feed to trigger the workflow. Use a ‘pending’ status to feed the AI with specific topics or target keywords for each new article.
2. Create High-Quality SEO Articles
Use the OpenAI node to generate the article body. Pro Tip: Use a multi-step prompt to create a detailed outline first, then the full content to ensure depth and professional structure
3. Generate Featured Images with DALL-E or Midjourney
Integrate an image generation node to create unique featured images based on the article’s title. This ensures every post is visually consistent with the Fluxzyn aesthetic.
4. Automate Tags, Categories, and Excerpts
Use a separate AI chain to summarize the post into a compelling meta-description and extract relevant tags.
5. Direct Push to WordPress via API
Connect the final output to the WordPress node. Set the post status to ‘Draft’ for a final human review or ‘Published’ for a completely hands-off automation
FAQ
Do I need coding experience to build this workflow?
Basic familiarity with JSON and APIs helps, but you don’t need to be a developer. n8n’s visual interface handles most of the logic. The Code nodes I included are copy-paste ready — you just need to swap in your API keys and adjust the prompts.
How do I get a WordPress Application Password?
Go to WordPress Admin → Users → Your Profile → scroll to Application Passwords → enter a name → click Add New Application Password. Copy the generated password — you won’t see it again.
Will Google penalize AI-generated content?
Google’s official position is that they don’t penalize AI content per se — they penalize low-quality, unhelpful content. The key is ensuring the output is genuinely useful. I always review and edit posts after they publish, adding personal experience and updating any inaccuracies.
Can I run this on n8n self-hosted for free?
Yes. The self-hosted community version has no execution limits. You’ll need a VPS (around $5-6/month on Hetzner or DigitalOcean) and basic server setup knowledge. The workflow itself runs identically on self-hosted and cloud versions.
